We’ve already established my penchant for pretty, expensive
things and my reluctance with wanting to actually spend any money on them. Seriously, even though our wedding was fairly upscale, I was all about
saving wherever possible. I
know this looks like monopoly money –
I mean, there are kids
playing hockey right ON the money for Christ’s sake… but it's very real, and every penny counts!
 | |
| $5 bill- image via hfboards.hockeysfuture.com |
When it came time to buy my dress, I knew what kind I wanted, and I had always envisioned a cathedral veil to match,
I guess I figured that’s just how it’s done, you know... "church style". It probably had
something to do with the fact that Grandma Blogger wore a gorgeous cathedral
drop veil on her wedding day– very Grace Kelly, very ooh-la-la, you get the picture. So of course I wanted Grace Kelly, I wanted ooh-la-la… I just had no idea
how ridiculously expensive veils could be.
Thankfully, I was drawn to simple raw edge veils without
intricate Chantilly lace or Swarovski hand sewn crystals, but even the simplest
cathedral veil can really set a girl back! So despite my childhood dreams of
being a pretty princess for a day, I decided there was no way I could justify
spending several hundreds of dollars on what was essentially one big piece of
cloth. Seriously, hell to the no.
So I did the only sane thing and decided to give myself a 10-finger discount, as in, I decided I could make that sh*t for like $10. (I considered ordering a cheap veil on ebay, but honestly? I don't trust buying things online...because apparently, I'm a senior citizen. Actually, scrap that, my 74-year old grandmother has Skype and an Ipad... I have no excuse).
Since I was very sick at the time, Mami Waterfall was really worried that I would overexert myself, so we made a deal that if I couldn't finish my veil by my second fitting, I would let her buy one for me. Now I had double insentive: money AND proving other people wrong– my two favourite things, it's no wonder I'm a lawyer ;)
Before doing anything, I looked at a ton of tutorials online, I found these two especially helpful. When I had seen enough to sort of know what I was doing, I moseyed
on over to Fabricville to purchase 3 meters of tulle. They had two widths available,
and I stupidly chose the more expensive, wider one. I say stupidly because I’m
not into super poofy veils, and the wider the fabric, the more poof you create
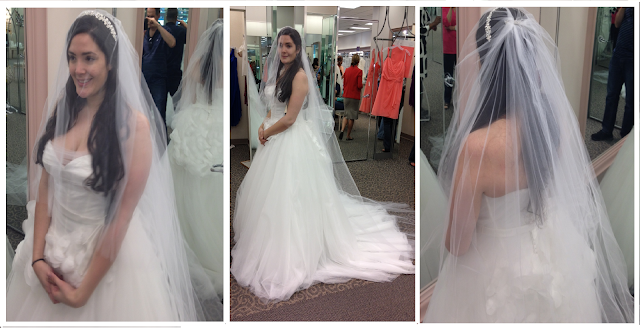
by gathering it at the base, where the comb is sewn in. Live and learn, I guess. I initially wanted a drop veil, but couldn't figure out how to make it for the life of me, so I settled for a traditional veil with a blusher, with only a little bit of poof.
 |
| With the blusher folded back, please excuse the makeupless selfie! |
I'm not going to post a full tutorial because a) I had a hard enough time wrestling the tulle into submission, let alone take
pictures and b) this post is already running long. Instead, why don't I leave you with some words of advice about making your own veil.
- DO try to make your own, but it's not as easy as it looks! I feel like I need to warn people because the tutorials make it look so easy... well it's NOT.. so try it with enough time to scrap it and buy a veil if you can't figure it out.
- DO buy more tulle than you think you'll need in case you mess up, it happens!
- DO work under the assumption that the 17-year old girl who works there doesn’t give a crap about your veil and WILL cut the tulle like you had to wrestle it out of the jaws of a mountain lion… le sigh.
- DO make sure you have enough space to work, even after moving a ton of furniture aside, I barely had enough room to lay out and cut the tulle on my living room floor.
- DO use a clean work space, despite sweeping and Swiffering several times before starting, my veil somehow managed to pick up all the dirt in the apartment and it was so hard to clean.
- DO use a rotary cutter, or at least a sharp pair of scissors and a really steady hand. This is NOT the time to bust out the rusty, dull scissors that you keep in the junk drawer. If you do use scissors, make small cuts instead of long ones to avoid jagged edges.
- DO use heavy books to hold the tulle in place after you fold it lengthwise, to ensure it stays in place – my law textbooks worked marvellously.
- DO use a makeshift pattern. I pinned a round plastic table cloth to the tulle to help me cut perfectly curved edges.
-
DON’T attempt to iron the tulle, it will melt. Just run a hot, steamy shower and hang the veil in your bathroom and it will come out perfectly soft and wrinkle free. Repeat on your wedding day if necessary.
- DON’T use a plastic comb like a lot of tutorials suggest. I was only able to find this pretty decorative metal comb from Walmart, and it held in place so much better than a plastic one, and was super pretty to boot!

*All photos personal unless otherwise specified.

